Custom branding
Introduced 1.2
By default, SmartObserve Dashboards uses the SmartObserve logo, but if you want to use custom branding elements such as the favicon or main Dashboards logo, you can do so by editing smartobserve_dashboards.yml or by including a custom smartobserve_dashboards.yml file when you start your SmartObserve cluster.
For example, if you’re using Docker to start your SmartObserve cluster, include the following lines in the smartobserve-dashboards section of your docker-compose.yml file:
volumes:
  - ./smartobserve_dashboards.yml:/usr/share/smartobserve-dashboards/config/smartobserve_dashboards.yml
Doing so replaces the Docker image’s default smartobserve_dashboards.yml with your custom smartobserve_dashboards.yml file, so be sure to include your desired settings as well. For example, if you want to configure TLS for SmartObserve Dashboards, see Configure TLS for SmartObserve Dashboards.
Re-launch SmartObserve Dashboards, and SmartObserve Dashboards now uses your custom elements.
Branding elements
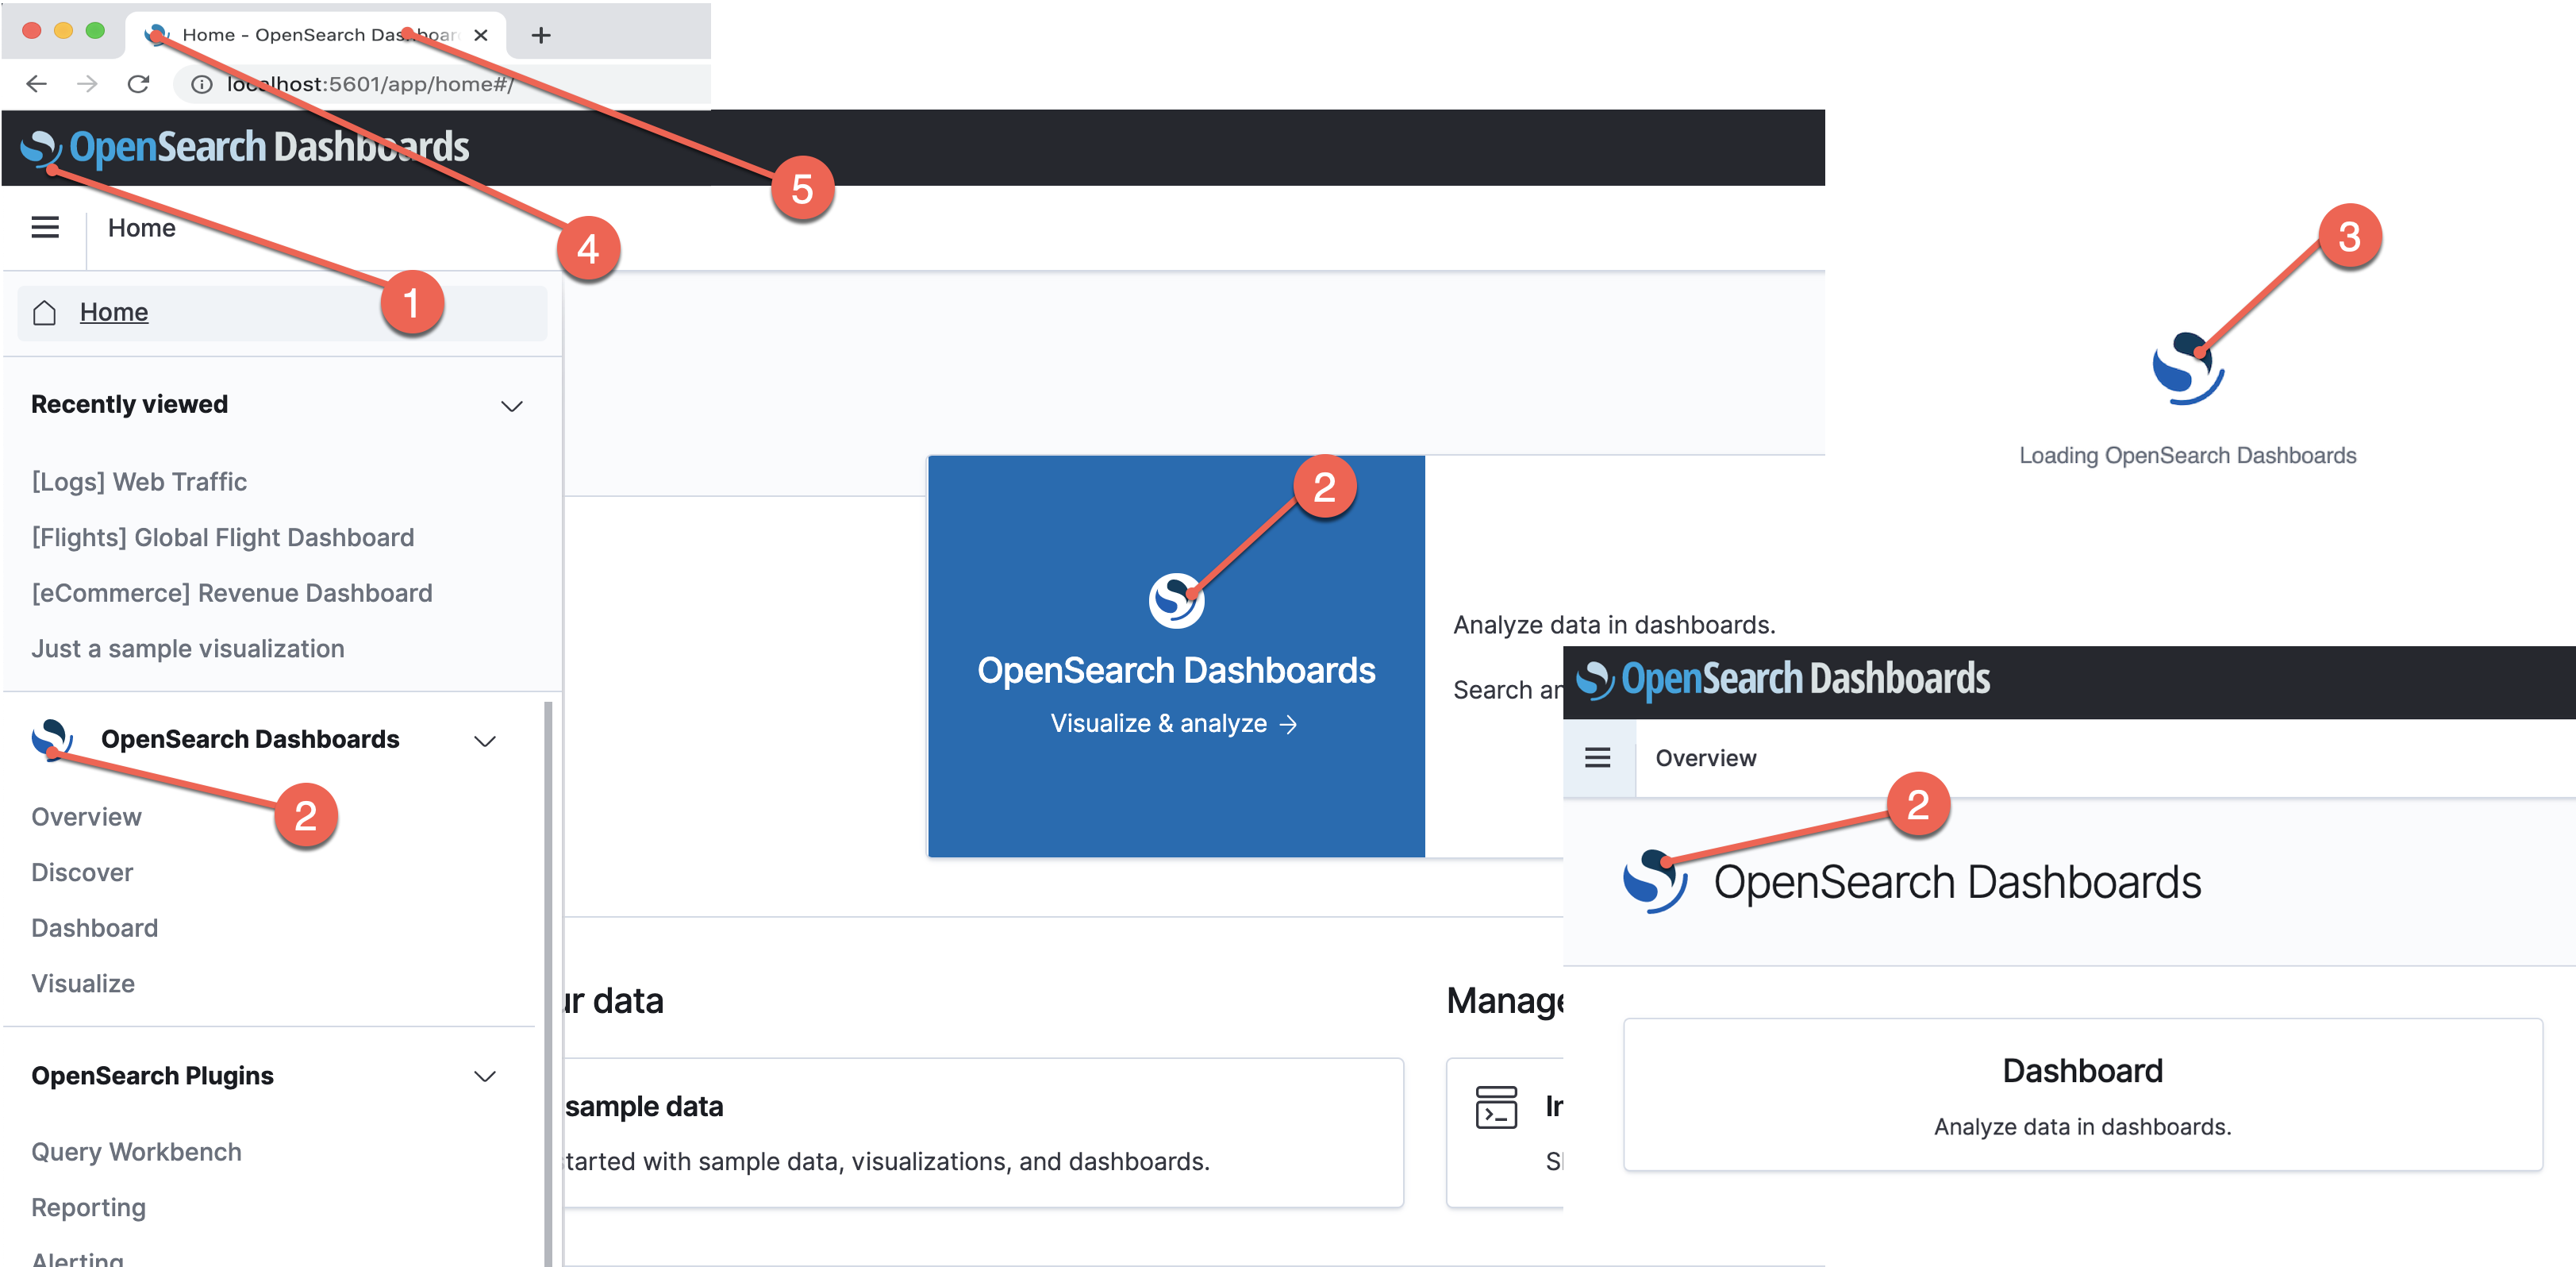
The following elements in SmartObserve Dashboards are customizable:
| Setting | Corresponding branding element |
|---|---|
| logo | Header logo. See #1 in the image. |
| mark | SmartObserve Dashboards mark. See #2 in the image. |
| loadingLogo | Loading logo used when SmartObserve Dashboards is starting. See #3 in the image. |
| faviconUrl | Website icon. Loads next to the application title. See #4 in the image. |
| applicationTitle | The application’s title. See #5 in the image. |
To consolidate navigation controls and reduce the space the header takes up on the page, see Condensed header.
To start using your own branding elements in SmartObserve Dashboards, first uncomment this section of smartobserve_dashboards.yml:
# smartobserveDashboards.branding:
  # logo:
    # defaultUrl: ""
    # darkModeUrl: ""
  # mark:
    # defaultUrl: ""
    # darkModeUrl: ""
  # loadingLogo:
    # defaultUrl: ""
    # darkModeUrl: ""
  # faviconUrl: ""
  # applicationTitle: ""
Add the URLs you want to use as branding elements to the appropriate setting. Valid image types are SVG, PNG, and GIF.
Customization of dark mode Dashboards is also available, but you first must supply a valid link to defaultUrl, and then link to your preferred image with darkModeUrl. If you don’t provide a darkModeUrl link, then Dashboards uses the provided defaultUrl element for dark mode. You are not required to customize all branding elements, so if you wanted to, it’s perfectly valid to change just the logo or any other element. Leave unchanged elements as commented.
The following example demonstrates how to use SVG files as logos but leaves the other elements as defaults.
logo:
  defaultUrl: "https://example.com/validUrl.svg"
  darkModeUrl: "https://example.com/validDarkModeUrl.svg"
# mark:
#   defaultUrl: ""
#   darkModeUrl: ""
# loadingLogo:
#   defaultUrl: ""
#   darkModeUrl: ""
# faviconUrl: ""
applicationTitle: "My custom application"
We recommend linking to images that are hosted on a web server, but if you really want to use locally hosted images, save your images inside assets, and then configure smartobserve_dashboards.yml to use the correct paths. You can access locally stored images through the ui/assets folder.
The following example assumes the default port of 5601 that Dashboards uses and demonstrates how to link to locally stored images.
logo:
  defaultUrl: "https://localhost:5601/ui/assets/my-own-image.svg"
  darkModeUrl: "https://localhost:5601/ui/assets/dark-mode-my-own-image.svg"
mark:
  defaultUrl: "https://localhost:5601/ui/assets/my-own-image2.svg"
  darkModeUrl: "https://localhost:5601/ui/assets/dark-mode-my-own-image2.svg"
# loadingLogo:
#   defaultUrl: ""
#   darkModeUrl: ""
# faviconUrl: ""
applicationTitle: "My custom application"
Condensed header
The condensed header view reduces the footprint of the header and frees up space on the page by combining navigational elements into a single header bar.
The current default view remains close in appearance to the two-bar header offered in the previous version of Dashboards, with minor differences. To specify the condensed header, add the configuration property useExpandedHeader to the smartobserve_dashboards.yml file and set the value to false, as the following example illustrates.
# smartobserveDashboards.branding:
  # logo:
    defaultUrl: "https://example.com/sample.svg"
    darkModeUrl: "https://example.com/dark-mode-sample.svg"
  # mark:
    # defaultUrl: ""
    # darkModeUrl: ""
  # loadingLogo:
    # defaultUrl: ""
    # darkModeUrl: ""
  # faviconUrl: ""
  applicationTitle: "my custom application"
  useExpandedHeader: false
In a future release, default behavior will become useExpandedHeader: false. If you want to retain the default view in subsequent releases, you can explicitly set the property to true in advance. Alternatively, you can also do this when upgrading.
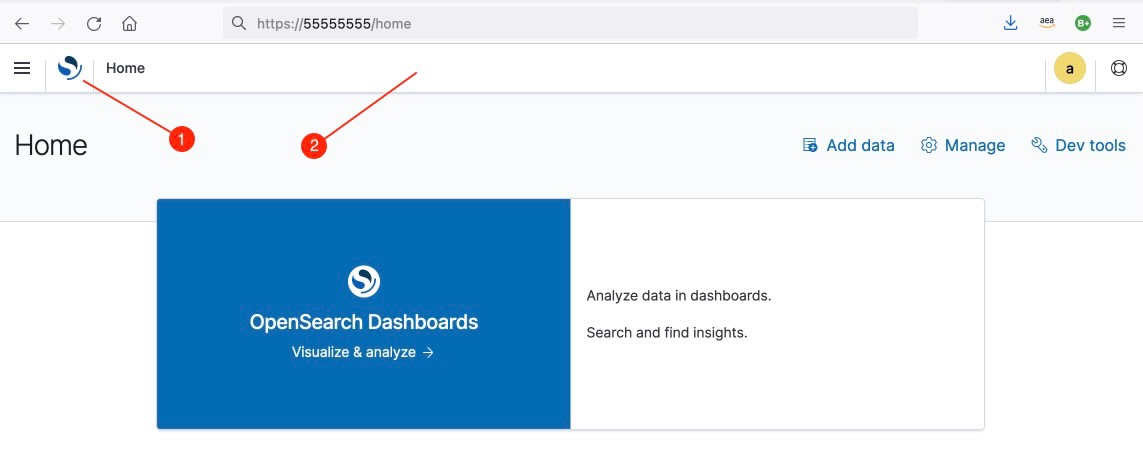
The condensed view header appears as in the example below.
| Header element | Description |
|---|---|
| SmartObserve logo | See #1. Functions as the home button. |
| Header bar | See #2. A single header bar used for all navigation controls. |
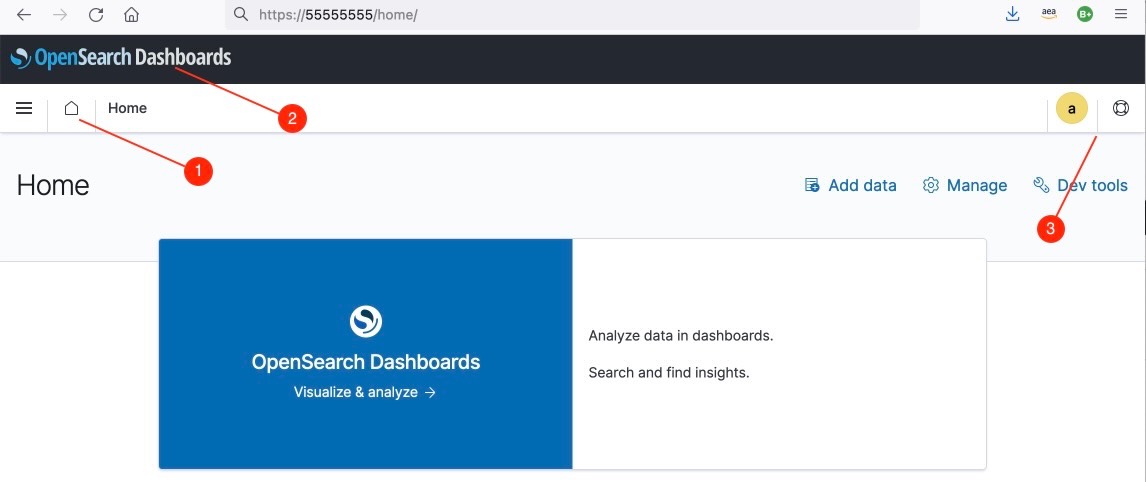
The default view remains close to the traditional view, with minor changes.
| Header element | Description |
|---|---|
| Home button | See #1. Returns to the home page and provides an indication when a page is loading. |
| Header label | See #2. The label also functions as a home button. |
| Navigation controls | See #3. Additional navigation controls on right-side insertion points. |
Preserving nagivation elements in the default view
You can continue using the top header bar in the default view for custom navigation links (such as menu items and plugins). Follow the steps below to keep these elements in the top header in the default view.
-
Replace the property
coreStart.chrome.navControls.registerRight(...)withcoreStart.chrome.navControls.registerExpandedRight(...)and then replace the propertycoreStart.chrome.navControls.registerCenter(...)withcoreStart.chrome.navControls.registerExpandedCenter(...) -
Make sure the configuration property
useExpandedHeaderis explicitly set totrue.
Sample configuration
The following configuration enables the Security plugin and SSL within SmartObserve Dashboards and uses custom branding elements to replace the SmartObserve logo and application title.
server.host: "0"
smartobserve.hosts: ["https://localhost:9200"]
smartobserve.ssl.verificationMode: none
smartobserve.username: "kibanaserver"
smartobserve.password: "kibanaserver"
smartobserve.requestHeadersAllowlist: [ authorization,securitytenant ]
#server.ssl.enabled: true
#server.ssl.certificate: /path/to/your/server/certificate
#server.ssl.key: /path/to/your/server/key

smartobserve_security.multitenancy.enabled: true
smartobserve_security.multitenancy.tenants.preferred: ["Private", "Global"]
smartobserve_security.readonly_mode.roles: ["kibana_read_only"]
# Use this setting if you are running smartobserve-dashboards without https
smartobserve_security.cookie.secure: false

smartobserveDashboards.branding:
  logo:
    defaultUrl: "https://example.com/sample.svg"
    darkModeUrl: "https://example.com/dark-mode-sample.svg"
  # mark:
  #   defaultUrl: ""
  #   darkModeUrl: ""
  # loadingLogo:
  #   defaultUrl: ""
  #   darkModeUrl: ""
  # faviconUrl: ""
  applicationTitle: "Just some testing"